Flexbox Lesson #5
Adding Columns and Content
In this lesson we'll add some columns and content to the main element.
Fifth Exercise
Copy and Paste the code in red into the main element.
<main>

<div class="left">
<h1>Content</h1>
<p>This is content in the main section. This is content in the main section. This is content in the main section. This is content in the main section.</p>
<p>This is content in the main section. This is content in the main section. This is content in the main section. This is content in the main section.</p>
<p>This is content in the main section. This is content in the main section. This is content in the main section. This is content in the main section.</p>
</div>
<div class="right">
<h2>Sidebar</h2>
<p>This is sidebar content. This is sidebar content.</p>
<p>This is sidebar content. This is sidebar content.</p>
<p>This is sidebar content. This is sidebar content.</p>
</div>

</main>
🔴 Save flex-tutorial.html
Copy and Paste the CSS below the last entry in the style sheet.
main { /*Begin nested main*/
gap : 2dvw; /*Space between child containers 2% of viewport width*/

div.left { /*child container*/
flex : 3; /* width 3 times default width*/
border: solid 1px;
}

div.right { /*child container*/
flex: 1;
background-color : #eee;
p { /*nested paragraph*/
font-size : clamp(1rem , 1rem + .25dvw  , 1.125rem);
}
border: solid 3px dodgerblue ;
}

h1 , h2  {
color: dodgerblue;
font-weight: 300;
text-align : center;
         }
p {
text-indent: 1rem;
padding : 1dvw 0; /*whitespace is your friend*/
  }

} /*End nested main*/
🔴 Save flex-tutorial.html
👀 Look at the page with your browser.
The Result
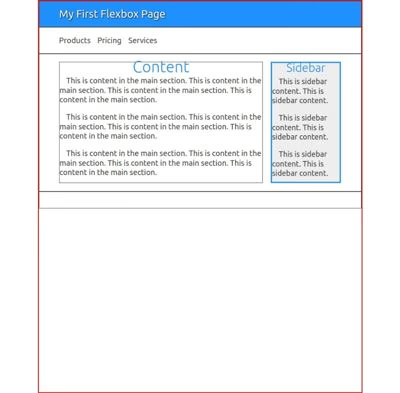
You should see something similar to this image. If so, you're ready to add the footer in the next lesson.
Explanation
Because the main element was defined in the second lesson the only thing we need to add is the gap between the columns. 2dvw is 2% of the current viewport width. Increase or decrease as needed.
Remember to remove borders in the last exercise.