CSS - Float Property
The float property is a very helpful tool for aligning divisions on a web page.
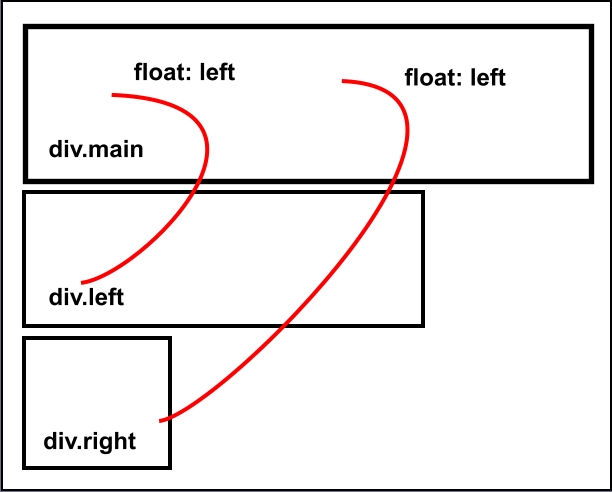
In the diagram shown below, we customize 3 divisions using the class method and call one main which is our container.
We want to divide main into 2 columns. We'll place our content in the left column and a navigation device in the right column.
We place the HTML code shown below on our web page and look at it in our browser.
They line up on the page below the main division as shown in the diagram.
<div class="main">

<div class="left"></div>

<div class="right"></div>

</div>
How do we get them to line up in their proper positions within the main division?
First we size them properly and then we add the float property to all 3 divisions on the style sheet.
Important: The combined width of the two nested divisions must not exceed the width of the main division or 100% of available space!!
Anything you add in the way of borders, padding or margins adds to width.
*We use container divisions in our explanations because it makes the concept a bit easier to explain to beginners. Containers are optional and are a matter of the taste of the designer.
The float property is added to the main division so that it will expand with the height of the longest nested column(division).
HTML Code
<div class="main">

<div class="left"></div>

<div class="right"></div>

</div>
CSS
/* remove default padding and margins */


* {

padding: 0 0 0 0;

margin: 0 0 0 0

}


/*Set the width for the main division */


div.main {

width: 100%;

float: left

}


/* Set the width for the left division.

  Add float: left to assign it to the

next available position in main. */


div.left {

width: 80%;

float: left;

}


/* Set the width for the right division.

Add float: left to assign it to the

next available position in main. */


div.right {

width: 20%;

float: left;

}
Beginner Tips
The combined widths of your nested divisions must not exceed the width of the main division or 100% of available space.
Beginners will run into problems getting adjacent horizontal divisions to line up side by side. See our Visual Diagrams explaining problem.
Other Uses
You can also position elements like images and paragraphs inside a division using the float property.
Liquid Design
The sizing of divisions in liquid designs requires the use of relative values or percentages.
The same rules apply for summing the nested divisions within a container division. If the width of the container is 100%, the combined values of nested division width, margins and padding, must not exceed 100%.
HTML Code
<div class="main">

<div class="left"></div>

<div class="right"></div>

</div>
CSS
/* remove default padding and margins */


* {

padding: 0 0 0 0;

margin: 0 0 0 0

}


/*Set the width for the main division */


div.main {

width: 100%;

float: left

}


/* Set the width for the left division.

  Add float: left to assign it to the

  first available position in main */


div.left {

width: 72%;

margin: 0 4% 0 4%;

float: left;

}


/* Set the width for the right division.

Add float: left to assign it to the

next available position in main. */


div.right {

width: 16%;

margin: 0 4% 0 0;

float: left;

}
Sum the values: 72 + 4 + 4 + 16 + 4=100
Visit a Demo of this code
Note: Container divisions aren't required for creating columns. If you don't use them, the same rules apply. The sum of width, margins and padding of adjacent divisions cannot exceed 100% of available browser space. Containers are helpful if you want to add background images to a specific section of your page. Remember to add the float property so that they expand as nested divisions expand.
Note: Test liquid designs at monitor resolutions as low as 800x600.