Create a Website with HTML5 - Lesson #5
Adding the Footer Division
In the last lesson we added our navigation device and main division with content, formatted it with a style sheet and previewed in a browser.
In this lesson we'll add our footer , with information and add the style settings.
The <footer> tag is another new tag added in HTML5. It's simply another division tag given a name for a specific purpose like the header tag.
Exercise #1
In Exercise #1 we'll add a footer to the page and add it's style settings to the style sheet.
Copy and paste the code shown below into mytemplate.html below the closing </main> tag for the main division.
<footer>
<p>© Copyright 2025 All Rights Reserved www.yourdomain.com</p>
</footer>
Save mytemplate.html
Copy and paste the code shown below into the style sheet below the last entry.
footer {
width: 100%;
background: #336699;
float: left;
margin: 0 0 .5% 0;
border-radius: 10px;
box-shadow: 5px 5px 10px #202020<
}

footer p  {
font-size : 16px;
text-align : center;
color: #efefef;
padding: 1% 0;

text-shadow: 1px 1px 0px #202020
}
Save mytemplate.html
Preview mytemplate.html.
You should have a pretty good idea of what you should be looking at.
Exercise #2
Before we start creating new pages, we'll dress up the navigation bar by adding a couple of lines to the style sheet.
Copy and paste the code shown below into the style sheet below the last entry.
nav a {
   color: #efefef;
text-decoration: none
}

nav a:hover {
text-decoration: underline
}

nav a:visited {
   color: #99ccff;
 }
Save mytemplate.html.
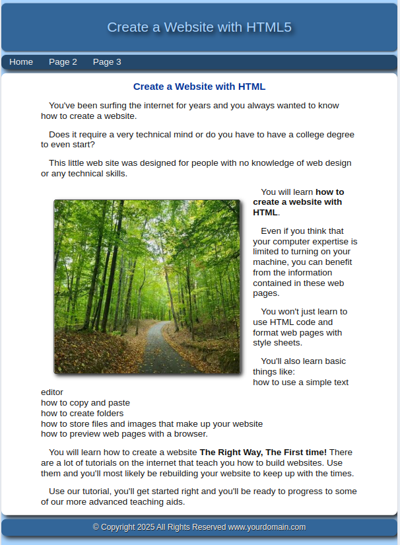
Preview the web page in your browser.Appears here as it would in a Kindle at 800 pixels viewing width.
Using mytemplate.html to Create New Pages
In the next exercise we'll use our finished web page as a template to create 3 new web pages which can be accessed from the navigation bar.
What's a Web Template?
A web template is a predesigned web page that can be used to create the pages of our website.
When creating your own template you should get the template page as complete as possible.
Try to plan the site and get as many of the future pages listed in the navigation device as you can.
In this example we have planned for three pages. (index.html, page2.html and page3.html )
Complete all information in the footer.
Get everything the way you want it and you are ready to use the template to create new web pages.
The Procedure
We will use mytemplate.html as a template to create the 3 pages of our website.
We will use the Save as filter of your text editor to save mytemplate.html as index.html, which the the default name given to the main or home page of any website..
We will use the Save as filter of the text editor to save index.html as page2.html, make a change to the heading tag on the page and save it again.
The we'll use the save as filter to save page2.html as page3.html, make a change to the heading tag and save it again.
When we finish we'll have a 3 page website.
Creating index.html
Click File on the text editor and use the Save as filter to save mytemplate.html as index.html.
Creating Page 2
Click File on the text editor and use the Save as filter to save index.html as page2.html.
Now find the h1 tag under the main tag:
<main>
<h1>Create a Website with HTML</h1>
Change it to:
<main>
<h1>This is Page #2</h1>
Save page2.html again.
Creating Page 3
Click File on the text editor and use the Save as filter to save page2.html as page3.html.
Now find the h1 tag under themain tag:
<main>
<h1>This is Page #2</h1>
Change it to:
<main>
<h1>This is Page #3</h1>
Save page3.html again.
Preview the 3 page website and use the links in the navigation bar to traverse the different pages.
You should have a web site that closely resembles this tutorial.
Resize the width of the browser window when you view the page and see if the images scale in size to fit the available space of the window.
If it does and everything looks neat and clean you're ready to go again.
Delete all your work and start again.
The more you see the HTML and CSS code, the more you will remember!
This time through concentrate on your copy and paste routines and identifying the proper position within the code for pasting your HTML code.
The main focus of this tutorial as you have discovered, is not really to learn HTML and CSS, but to become familiar with looking at code, copy and paste procedures and previewing changes in your browser.
When everything in this tutorial is second nature you'll be ready to tackle our more advanced tutorials that teach you to create columns, create multiple pages and link them together and learn the why and wherefores of how things work on a web page.
Then you'll be able to concentrate on actually learning HTML and CSS.
Ready to Advance
If you've worked your way through several times and are comfortable with looking at code and previewing web pages you can proceed to our more advanced tutorial on 9 Step Tutorial
Our Advanced tutorial will show you how to create drop down menus and use Media Queries and break points. You'll also learn to use Developer Tools and the W3C Validator to check your code.
Free Responsive Templates
If you think you learned enough from this tutorial to start creating a simple responsive website, you should visit our newest free web template collection. Free Responsive Templates
 go back