Create a Website with HTML5
Overview
You are going to create a 3 page website very similar to the website you are viewing.
The process will be accomplished by simply copying and pasting code into a simple text editor and then previewing your work with a browser.
I do recommend that you delete your work when you finish and run through the tutorial several times to cement the learning process.
 Complete all 5 Lessons.
DO NOT SKIP STEPS!!
You will create what are called liquid web pages using HTML5 code.
If you don't understand what that means, grab the side of your browser and squeeze it inward until your browser window is just a very skinny column.
Watch as the heading text and the large picture on the web page shrink in size to fit the available window space.
Help:If you don't know how to resize the browser, try grabbing the right edge of your browser window with your mouse by holding the cursor over it. A curved triangle with a vertical line should appear or if working with a side bar open a 2 headed horizontal arrow
If if the triangle doesn't appear, you need to set your browser in Resize Mode.
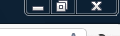 The resize buttons shown here are in the top right corner of your browser.
Click the middle icon (square).
Now hold the cursor over the right edge of the browser window until the triangle appears. Line the vertical line up with the edge, press the left mouse button and while holding it down push the side of the window to the left.
You can do the same with the bottom edge to adjust the height of the browser or as you will see, your the text editor windows.
Liquid Web Pages
Web pages that adjust to browser width are called liquid or today, Responsive Web Designed pages.
They will also adapt to the resolution of the visiting appliance used to view the website. You could probably view this simple one column website on your cellphone with no problems.
Work through this tutorial several times. Learn as much as you can and you'll be ready to go on to our Advanced 9 Step tutorial. (Drop Down Menus - Also media Queries, Developer Tools, W3C Validator and more....)
Things to Watch For
Exercise #
Red blocks introduce Exercises. There can be more than 1 Exercise in a lesson. There can also be more than 1 step in an exercise. Don't Skip anything!
Copy & Paste
Green blocks contain instructions for copying and pasting code blocks. Read all the information in a green block. It tells you WHERE the code should be pasted.
Help:
Yellow blocks contain extra information to HELP along the way. Some contain links to other tutorials like copy and paste procedures, creating folders or previewing web pages. If you don't know how to do something look for the Yellow block.
Focus
Orange blocks usually come at the end of a lesson and tell you where to focus your attention.
Save
Be sure to SAVE mytemplate.html each time you see the word Save in red.
Navigating To navigate through the pages look for the blue arrow on the bottom of the web page. Right arrow sends you forward, left arrow sends you back to previous page.
Recommended Browser
I recommend the Microsoft Edge browser for Windows and Linux users.
Important!! Don't use Internet Explorer. My advice: Retire it and send it to the Round File.
The only way you can guarantee your failure is if you don't try.
Take a quick look at the Lesson Overview and let's get started.
Lesson Overview
- Lesson #1:
- Getting Organized
- Finding Your Text Editor
- Setting Up to work
- Lesson #2:
- Exercise #1 - Create Basic HTML Page
- Exercise #2 - Create the Embedded Style Sheet
- Exercise #3 - Add Meta tags to head section
- Lesson #3:
- Exercise #1 - Add Header Element, Paragraph tag and format with Style sheet
- Lesson #4:
- Exercise #1 - Add Nav Element with links and format
- Exercise #2 - Add Main Element and format
- Exercise #3 - Add content to Main Element and format
- Exercise #4 - Add image to Main Element and position with style sheet
- Lesson #5:
- Exercise #1 - Add Footer Element with information and format
- Exercise #2 - Create New Web Pages using mytemplate.html as template.
Focus: Take some time to learn to manipulate your browser For most beginnerrs learning to use a browser offline can be very challenging, especially for Windows users. There will be Helps along the way.
 go back